Saturday, December 31, 2011

Happy New Year!

Well, it is the end of 2011. So it’s time for my annual Happy New Year blog post. It has been a really great year for Clay Conner Guitars. I feel very fortunate to be able to make a living doing what I love in such a rough economy. Many thanks go out to my friends at Guru Guitars. They continue to run a great shop and keep me buried in repair work! Check out their website at www.guruguitarshop.com. Better yet buy a vintage guitar or amp from them! You won’t be sad. As I sit here trying to catalog all of the news worthy items that have transpired this year, I’m finding it hard to sort through everything. So much has happened and so many ideas have floated through my head over the past year it seems like one big blur. The custom guitar side of Clay Conner Guitars has been growing slowly and steadily, but it has done so largely on its own. I have been so busy with the repair work for Guru that I haven’t had much time to work on promoting my own instruments. Somehow amidst all of the chaos, I’ve have managed to produce and sell a few guitars. One of the big highlights of 2011 was our very successful trip up to the Montreal Guitar Show. It was my first time exhibiting at a major international exposition. I was honored to be a part of it! My instruments got a lot of attention, I met a lot of great people, and sold a guitar! It was a great experience and definitely the kind of exposure I need. I’ve been invited back for the 2012 show, and I’m looking forward to the trip! Over the last couple of months, I have been thinking a bit about what goals to set for 2012. The obvious goal is more sales...but ideas of balance and sustainability have been rattling around my head for most of 2011. One of the down sides to doing repair work is that the thousands of guitars that cross my bench serve as constant reminders of just how many instruments already exist. There seems to be a never ending flood of guitar companies churning out product. I occasionally get to the point of wondering why I need to add my own screaming to the noise of it all. I recently watched a documentary about Ayrton Senna, one of the worlds greatest Formula One racing drivers. After winning his first world championship, he was asked by his mother when he was going to stop racing, he answered: “I can’t stop.” I’m paraphrasing, but I kind of feel the same way about my guitar building...I can’t stop. So the question for 2012 is: How do I grow this business into a company that I enjoy running, which creates thoughtful and meaningful products with minimal impact on the planet, and still be able to pay my bills? I don’t know that I will be able to figure all of this out in just one year...but 2012 will be all about moving in that direction. On a practical level, We’ve finally updated the website. www.clayconnerguitars.com The new site is much more dynamic and it is easy for me to make changes and updates so check back occasionally. The blog,www.projectsonthebench.blogspot.com has been moved over and included in the new site. This will be the last post here at blogger...So check for new posts on the blog button of the website. As always, many thanks go out to everybody who has bought a guitar, inquired about a guitar, sent us an email, joined us on Facebook or Twitter, told a friend about us, or sent us happy thoughts from afar. We are very grateful! Happy New Year! Clay www.clayconnerguitars.com www.facebook.com/clayconnerguitars

Friday, December 2, 2011

Old Guitars (and a new one) Update

Well, I told myself I wouldn't start this blog with a lament about how much time has past since my last post....so...er... let's just jump right into it. For those of you who follow the blog, you know that I have taken on a couple of major rebuilds lately. This past month has been all about reconstruction and restoration. Here is a progress report: After numerous patches and interior work that is hard to take pictures of, the 1956 Martin is about ready for finish. The old pearl ovals inlayed on the peghead are no more. I found some wood that matched pretty well and after some careful work it's looking pretty good...and I didn't screw up the logo. Hooray! Spraying the finish will be tricky though!
Removing and patching the extra fingerboard inlay was pretty straight forward. I had some nice ebony which matched pretty well. Here it is back to the original inlay pattern. After the new frets are installed it should look great!
The back is stripped, loose binding is glued. Everything is starting to look much better.
Here's the body and neck, ready for finish. The top is still pretty rough looking, Unfortunately the play-wear is pretty extensive. I didn't feel that I could clean it up completely without make the top too thin. With a new bridge and pickguard it should look good when it's all done.
Hotrodders have a term I remember from growing up...Resto-rod. As I recall a Resto-rod is a vintage car which looks from the outside to be original. On the inside however, many of the major components have been modernized for comfort and performance reasons. This is the idea which kept coming back to me as I worked on the old Henry L Mason Parlor guitar. Information on this guitar is pretty scarce. From what I can tell it was probably made around 1890 or so. What ever the manufacture date was, the old parlor guitar is very different now! Just for reference, here is the old top. The bracing pattern was designed before steel strings were popular. Even in good shape, it would not standup to the tension of modern acoustic guitar strings.
Here is the new top. I'm sure you can see the difference. In this photo the braces are rough...
To tune the top, I trim and shave the braces. Here the top is almost ready.
On the body, I had to fill in the areas where the old braces met the linings.
Once the linings were all patched and cleaned up, I re-notched them for the new bracing pattern.
Ready to glue the top on!
New top...ready for some finish.
A few coats of lacquer makes everything shiney.
After sanding and buffing, it was time to set the neck.
And then install the new bridge..
The neck was badly bowed. So I pulled the frets, trued up the fingerboard and..
Installed new frets. Then the it was the moment of truth...Strings!
The Henry L Mason lives again! I'm very happy with the way it turned out. It is a lovely little guitar...and it's for sale! Email me if you are interested (connerguitars@gmail) or contact the guys at Guru Guitars (www.guruguitarshop.com). I also finished up the new 504 Jazz jr. Here are a couple of photos. It's for sale as well.
Thanks for reading the blog! Talk to you all soon! Clay

Sunday, October 30, 2011

Old Guitars

It's astonishing how quickly October has dissappeared! I can't believe it has been over a month since my last post. As we careen headlong into the holiday season, it's time for a quick update. I had planned to post a bunch of pictures of the custom builds I have going, but to be honest I've spent most of the last month puzzling over repairs at Guru Guitars. Sometimes the repair load is pretty easy to punch through. I've gotten fairly efficient and comfortable with the quick setups, electronic fixes, and refrets which usually comprise our repair backlog. Every once in a while you get a project which requires some thought. About a month ago a very thought provoking repair came in...the complete restoration of a 1956 Martin D-28. The current owner said it once belonged to Doc Watson. I have no idea if that is true. I also have no way to verify the authenticity of his claim. the only thing I do know is that the guitar was in very bad shape. For a week or two, I kept looking at it on the list. Occasionally, I would take the guitar out if it's case and after turning the instrument over in my hand a few times, I would gently place it back in its musty home. I can't quite explain my unease with this project. Perhap it's the dilapidated state of the instrument. It might also be that Martins from the 50's in good condition often have a five figure price tag. The truth is, I am a procrastinator by nature and have lived with this affliction for some years now....I recognize the signs. In the immortal words of countless movitational desk calendars..."The journey of a thousand miles begins with one step." The point is I finally started...this is the chronicle of my adventure thus far: Here's the guitar on day one. Despite having had at least three different pickguards on it at one time, the top is gouged out pretty badly from heavy picking. Yes, that is plaster covering the area where the bridge once was. FYI whatever problem you may encounter with an acoustic guitar top...I can assure you that plaster is not the answer. The good news is, the top is not cracked.
For some unknown reason, somebody "inlyayed" mother of pearl ovals on the peghead (I say that in quotes because they are half inlayed/half stuck on). At any rate they will have to be removed and filled with wood to match the original. My main concern with this operation is that one of them is very close to the logo. If I damage the logo during the filling process, whatever value the guitar has left will be significantly reduced.
The same hap-hazard inlay artist got hold of the fingerboard. I'll need to remove and fill the strange square-ish inlays and the randomly placed dot at the 7th fret
At some point, a previous owner attempted to remove the original finish from this guitar. They used some sort of stripper, which half worked on the back but ran down the sides of the guitar bubbling the finish badly. Usually, refinishing a valuable vintage guitar is a no-no, but the owner wanted it done. Given the state of this guitar it's probably not a bad idea.
Before I got to work stripping the remaining bits of old finish off I needed to fix this some loose binding. This is the worst of it. The binding has shrunk significantly over the years! Luckily, with some warm air and gentle persuasion I was able to stretch it back into shape and glue it down.
Just a photo of the the neck block. It looks like someone tried to change the model Number at some point. Our best guess is that this is a D-28
I was able to dissolve most of the plaster with some water and some gentle scubbing. In the process I uncovered some places where the top badly torn out. They will need to be patched in if the new bridge has any hope of staying glued on!
Here's a photo of the top after I stripped it. Oh yeah, before any of this stripping started I removed the neck. I forgot to take pictures though...sorry! Part of this restoration includes resetting the neck and installing new frets.
With the neck removed, the binding fixed and the finish stripped. I got to work gluing loose braces. Most of the back braces were loose. The top braces seem to be hanging in there. There are some issues with the bridge plate, which is a piece of hardwood (in this case Maple) on the inside of the top underneath the bridge area. It is badly worn and probably should be replaced. Unfortunately, looks as though someone might have tried to repair it with some sort of epoxy. I'm afraid removing it might cause a lot of damage. I'm still pondering plan B. stay tuned!
With the hide glue pot cooking away for Martin project, I felt like it might be a good time to work on my old Parlor guitar. It only took a few minutes to remove the crumbling top. Here is the body with the top removed.
Here is the inside of the old top. Look how lightly it is braced! It's no wonder it self destructed! That long horizontal piece of wood with the six small holes drilled through it is the bridge plate FYI.
The old top next to the new one. The old top is Adirondack Spruce, but I only had Sitka tops in the shop. I briefly contemplated ordering an Adirondack top but in the end I decided to use Sitka instead. It is a little lighter in color, but it should sound nice!
I did my best to match the rosette with the stuff I had on hand. It's pretty close!
Finally, I made a mold to keep the body in check while the top is removed. I'll need to patch in some of the linings where the old braces were notched in. There are also a couple of loose back braces. Next week I'll get to work bracing the new top, If I have time!
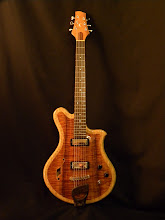
Back in the 21st Century...I sprayed the new 504 Jazz Jr. from the last blog post. The finish is curing and it should be a guitar in a couple of weeks. Here are a couple of photos I snapped before finish.
This guitar will be for sale. If you are interested please shoot me an email. connerguitars@gmail.com
As always, Thanks for reading the blog! P.S. We are in the process of updating the website www.clayconnerguitars.com. Some wacky stuff is going on, and the site has been up and down. Sorry! I hope we'll get it sorted out soon! As always if you have any questions feel free to email me.

Friday, September 16, 2011

Current Events

Well, the last couple of blogs have been a bit wordy. So, I thought that it was time to get back to the pictures. The repair load at Guru Guitars continues to take up most of my time, but here are some shots of projects I have going on the side. A number of years ago I was given this old parlor guitar. The stamp inside the body says Henry L.Mason, who is a maker I'm not familiar with. There is some speculation on the interwebs that these guitars may have been built by the Mason and Hamlin piano company, but I have been unable to verify that. If any one out there has any info I would love to hear it. Based on the bracing pattern I think it was built in the late 1800/early 1900's. It's in pretty bad shape but I've always wanted to resurrect it. It's a simple guitar with minimal appointments but it should be a fun one when it's all together.
The top has quite a few cracks.
The neck is loose.
In fact, It didn't take much to get it out of the dovetail.
The back and sides are in pretty good shape so the plan at this point is to remove the old top and make a new one. The old top has and antiquated style of bracing which was designed before steel strings became popular. The new top will have a more modern X-brace for use with steel strings. It should sound great! Stay tuned!
In addition to the parlor guitar project I have two custom builds going. The first is a 504 Semi-Hollow with fanned frets for a customer in Japan. Here are some in progress shots. The body and neck are made from Korina. Here is a picture of the chambering on the inside of the body.
This guitar has a Quilted Maple top. Here's the top fit into the body before carving.
...and the top with a rough carve.
another shot.
Here's the guitar with the top glued in. The f-hole is inlayed and cut out and decorative purfling is installed around the top. The fingerboard is Macassar Ebony. There is still a lot of work to do but things are looking good!
Finally one more 504. I've been calling it the 504 Jazz Jr. It is an exercise in simplicity. I've had this idea in my head for a while now for a simple, clean guitar which I could produce fairly easily. I was afraid that it might end up being too bland, but I think there are enough details on this to make it cool.
This guitar will have an inlayed pickguard, a simple tailpiece with a floating archtop style bridge and a Johnny Smith neck pickup. The body and neck are Korina. The fingerboard and all of the appointments are Honduras Rosewood.
Well, that's all for now, I'll keep you posted as all of these projects develop. Thanks for reading the blog!