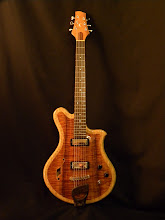
Overall, I'm really happy with this guitar! It sounds very warm and rich. I hope to record some sound clips and possibly a little video or two stay tuned!
Thursday, May 12, 2011
Post Partum
Overall, I'm really happy with this guitar! It sounds very warm and rich. I hope to record some sound clips and possibly a little video or two stay tuned!
Friday, April 22, 2011
Tradition and the New Guitars
One thing I've always been curious about, is Hide glue. It's a subject of much debate in the guitar nerd community. Some say there are tonal advantages to using it. Hide glue dries really hard and brittle, and the theory is that it transfers vibration through all of the glue joints better than the modern alternatives. I've used hide glue a bit for repairs, but never built a complete instrument using it. For those of you who don't know what hide glue is...it's a glue (shocking! I know) made from animal parts all boiled down to a goo... I just threw up in my mouth a little bit. By the time it gets to me, the glue is in a dry powdery form. I have to add water and heat to reconstitute it. Ethically I'm not sure I can get behind this glue, but I'm drawn to the tradition of it. Hide glue has been used as an adhesive for nearly 5000 years (if you believe Wikipedia!) Certainly some of the finest instruments around have been constructed with hide glue. In my world, the jury is still out, but I like the process of using it. I like that it takes skill and care to get a good glue joint. Skill and care seem to be disappearing from our world.
As I near the end of this build, my thoughts turned to the inevitable question of what finish to apply. The traditional finish for most Archtop guitars and most Flat-tops is Nitrocellulose laquer. I've sprayed my fair share of it over the years. These days I'm using a water based spray-on finish which I really like. It's less toxic than Nitro, it dries really hard and buffs out very nicely. My intent was to use this finish on the Archtop, but I could not stop myself from investigating another traditional technique...French Polish. Basically to French Polish, you apply very thin coats of shellac with a small pad, rubbing vigorously until each new layer blends with the previous one. It's a finish which has been used for years by furniture makers, violin makers and classical guitar builders. French Polishing quite an art! An art I would like to be good at, but after nearly a week of swirling shellac onto the Archtop, I decided that it was not to be. I love traditional ways of working and I enjoy exploring traditional techniques, but as I become more and more professional I'm finding a need to balance tradition with technology. In the end, I felt like French Polish was a lot of work. Shellac, even when applied correctly is a delicate finish. It can be damaged by water, sweat, alcohol etc. So, I decided to spray over the shellac with a few top coats of my tried and true water based finish. I'll let everything cure for about two weeks, and then the Archtop becomes a guitar!
Sanding the archtop between coats of finish
The archtop in the spray booth.
While the finish cures, I've turned my attention back to the flat top. It's pretty close to being done. I just need to do some fine tuning.
One of the last tasks is to inlay my logo on the peghead. I often feel that I need to get my "branding" together and come up with a better logo, but for now, I'm inlaying the letter "C" and some swirly bits. I made a crude jig to speed up the process. I use the plywood template to rout the recess for the scrolls.
I print the letter C out on to a piece of paper and glue it to some mother of pearl.
Next comes the careful work of cutting it out. I use a jewlers saw with a fine blade.
...And done...
The next step is to rout out a recess for the letter to fit into. It takes a steady hand...and a bit of patience. I scribe the outline of the "C" with a xacto knife and then use a white pencil to help me see the line. I do the routing with a Dremel tool and a very small bit.
Here's the finished inlay. The "C" is mother of pearl and the scrolls are thin aluminum which I bend to fit. The only thing left is a bit of sanding and then this guitar is off to the spray booth as well!
Monday, March 14, 2011
The Archtop is Getting Close!
First up, was the tailpiece. I've been experimenting with a new design a bit. The Idea is that a pin is dovetailed into the end block and the tailpiece clips onto it. the string tension holds it all in place. I really like the look of it! Here's the dovetail cut into the end of the guitar.
And then the pin slides in. The pin is oversized in this picture. I cut it down a bit...
and the tailpiece fits over it! A lot of work goes into building the tailpiece... Unfortunately I forgot to take any pictures. Here's the final product.
With the tailpiece about finished I turned my attention to the pickup. This guitar is really designed to be an acoustic instrument, but so many people like play amplified these days I thought I would include a pickup. Most electric guitar pickups and made of a coil of wire wrapped around a magnet. As the guitar string vibrates, it influences the magnetic field. This interaction creates a small voltage in the coil of wire. This becomes the guitar's signal which is sent to the amplifier. I've been using an old Singer sowing machine to spin the bobbin around while I guide the wire on to it. The wire is very fine, it's about as thin as a hair. It's pretty delicate work. Here's a freshly wound bobbin. This pickup will need two bobbins.
Each bobbin has a slot cut for a magnet to be inserted. Here's the whole assembly with magnets in a wooden cover which I made.
This is the top view.
Now that the pickup is wound I turned my attention to the finger-rest. It's pretty straight forward, but I did need to spend some time figuring out how to attach the pickup and get everything at the correct height.
Here's the result. it looks good...if I do say so myself!
The last thing to make is the bridge and the guitar will be ready for a final sanding and spraying the finish.
it will be a guitar soon!
Thursday, February 24, 2011
The Archtop and Flat-top Get Their Necks.
I'm getting close to having finished instruments!
I used the old inner tube trick to glue the binding onto the peghead of the flat-top neck...
...And the same for the Archtop
Then it was time to get to work carving both necks. This is one of my favorite parts of the guitar building process. For some reason putting a contour on the neck marks the point at which the guitar begins to feel like an instrument and not just a hunk of wood. It might be because the neck is really the main interaction point of the instrument, sure you need the body to amplify the sound, but the shape and feel of the neck really informs your sense of the guitar....at least it does for me. Anyway...it's a dusty job, but I love it!
I start by roughing out the shape with a rasp...
...And then I fine tune things with a cabinet scraper.
After a bit of sanding, I give it a coat of shellac to seal things up.
I go through the same process for the Flat-top neck.
After carving, I usually like to let the necks sit for a day or so, and then re-check them for lumps and bumps I may have missed. Over the next few days I'll refine them a bit more...
Here's a little preview, I'm getting close!
Wednesday, February 2, 2011
Repairs, Repairs, Repairs!
The first order of business was to build a jig to cut the binding channels around the outside of the guitars. I have made a couple different versions of this jig over the years but it was time to make a nice permanent one. Here's a pic of the cradle with adjustable slidey thingys that hold the guitar body.

The other part of the jig is a small router mounted on a sliding mechanism. the router has a bit that cuts the binding channel as you feed the guitar around under it.

Here's a close-up of the business end of things. The white collar rides on the top of the guitar. the grey cutter underneath cuts the channel and the bearing rides on the outside of the guitar. The cutter is slightly larger than the bearing so it cuts a consistent rabbit around the outside of the guitar.

Here's a picture after the binding channel is cut. I cut some thin pieces of wood which will be bent to the shape of the guitar and then glued back into the channel. It may sound like a strange process to cut out wood and then glue it back but, it helps to seal the end grain on the top and back and it looks cool! At any rate, It's called binding

I've recently discovered the magic of bicycle inner tubes...they are awesome for clamping odd shaped things. I've been using them to clamp the binding into the channel while the glue dries.

Another shot.

Here is the semi-finished product, the back of the flattop with the binding installed. I cut the binding very slightly oversized and then scrape it all down flush. I've still got a bit of work to do!

Here's a detail shot.

...And a shot of the end graft.

The back is done. Now, same thing for the top!

And then repeat for the archtop.

A few more hours of scraping and the guitars are starting to look pretty good!

The next step is to rout the mortise for the neck pocket. Once again, I've worked out a new jig...

After some nervous routing and a little bit of preliminary neck fitting, everything seems to line up! Whew!

Stay tuned, I hope to spend some extra time on these instrument over the next week or so. I hope I can get them nearly finished!
Subscribe to:
Posts (Atom)