Friday, December 31, 2010

Happy New Year

Hello Everybody, Happy New Year!


I wanted to say thanks for all of the support this past year. 2010 has been great for Clay Conner Guitars! I know some of you have been following the progress on Facebook www.facebook.com/clayconnerguitars and here at the Blog, But for those of you who haven’t seen the posts, here are the highlights.

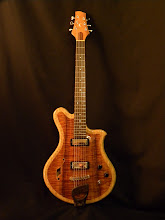
I am now working nearly full time at Guru Guitars www.guruguitarshop.com here in Raleigh NC. We have so much repair work to do, that I have to squeeze in growing my own business whenever there is time. It means that I have put in some long hours, but I’ve learned a lot. My guitar building has been steadily moving forward, and I’m really excited about all of the new instruments I’m turning out! I feel like I’m reaching a new level with my designs and skills. My guitars are getting a lot of attention in our shop.

I’ve been doing a lot of soul searching this year trying to decide which direction to take the business…what kind of business I want to run…what impact I want to make on my community and the planet etc. So far there have been a lot more questions than answers, but the idea of community has been coming back over and over again. So much so, that I’ve begun to think of my clients and everyone who I interact with as a big family. The Conner Guitars family! It’s been nice to think of this business as our business. I would like to start including you all a bit more in the process. So…one of you needs to meet with the accountant next week! Just kidding! All joking aside, I’ve been posting photos of my most recent guitar builds here at the blog. I plan to keep this up for 2011. People seem to be really interested in the process. It’s fun to let people behind the curtain so to speak. I have some ideas about a group project of sorts, but I need to flesh them out a bit before I announce it. Stay tuned!

In my mind, 2011 is all about going to the next level!...and that’s the plan! We’re working on updates to the website. We hope to have some t-shirts for sale fairly soon. We are trying really hard to make it to the Montreal guitar show in 2011. Beyond that…

I can’t wait to see what is coming and to welcome some new members to the Family! Thanks again for all of the love this past year! It keeps us going! I look forward to talking with you soon!


Clay
www.clayconnerguitars.com
www.projectsonthebench.blogspot.com
www.facebook.com/clayconnerguitars

Tuesday, November 23, 2010

More Guitar Building Photos

Picking up where I left off in the last post...The neck building continues. The headstock design I use is a bit wider than the neck blank. So I have to glue some extra wood to make up the difference. Believe it or not, this is pretty common practice. The pieces of wood are often called the 'ears'.


Once the glue dries, it's time to start profiling the neck. I've made some plywood templates to shape the necks. Here's the headstock pattern which I attach to the neck using double stick tape.


First I rough cut the profile on the bandsaw and then head over to the router table to clean everything up. The cutter I use is called a pattern bit. It has a bearing which is the same size as the cutter head. The bearing rides against the plywood template and the cutter will trim the wood exactly to the shape of the template.


Here's a shot of the headstock after routing.


Using the same procedure, I taper the neck.


And here's the final product. The Archtop neck.


I follow the same steps to shape the Flat top neck, here they are side by side.


After the shaping is complete, I glued a vaneer over the top of the headstocks on both necks. Unfortunately, I forgot to bring my camera so I didn't get any pictures of the process. The vaneer is decorative but also helps to strengthen the headstock.

I've been putting graphite spars into my necks to help with the long term stability. Once the neck is tapered, I rout two slots on either side of the truss rod to drop the graphite into.


And then it's time to make the truss rods...I mentioned in an earlier post that the truss rod is a steel bar which is inserted into the neck to counteract the tension exerted by the stings. There are a few different systems to make this happen, the one I use basically works like this: The steel rod is threaded on both ends. One end attaches the an anchor point at the heel end of the neck, and the other end sticks out at the headstock end with a nut and washer on it. I mentioned earlier that the slot I cut into the neck is curved, so I bend the rod to match that curve. I then install the rod into the neck and cover it with a piece of wood called a spline. Once the fingerboard is glued on, the rod is sandwiched into the neck solidly but it is still curved. So here's where the magic happens...Once you string up the guitar and the strings pull the neck forward. You can tighten the nut on the headstock end of the guitar. This forces the rod to try and straighten out, and if everything is installed correctly, pulls the neck back flat against the string tension.


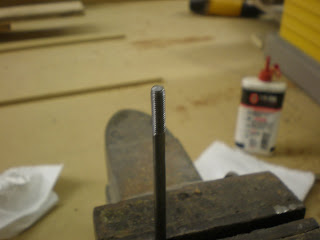
You can buy pre-made truss rods but I've been making my own for a while now. I start with some 3/16" steel rod. After cutting it to length, I thread both ends.


Here's a blurry picture of the threads.


I install the anchor on to one end.


Here's the finished truss rod ready to be installed into the neck.


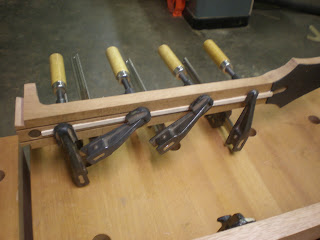
Here I'm gluing the truss rod in with the spline on the flat-top neck.


I do the same for the Archtop.


Once the glue dries, I trim the spline down flush with the top of the neck. Then I glue in the graphite, and finally, it's time to glue on the fingerboard.


Here is the Archtop neck with the fingerboard glued on.


I couldn't resist setting the neck up on the body to get an idea of how it will look. Looks pretty cool! I'm excited to hear how it will sound!


Happy Thanksgiving everybody! talk to you soon!

Wednesday, November 17, 2010

Archtop Update

I came in this week, and as always, I started my morning by tapping on the archtop and acoustic guitar bodies. Each morning I like to spend some time listening to the guitars and making small adjustments. They are both sounding pretty good, but I felt like the archtop back was a bit too stiff. So I got to work thinning out the edge. This area on an archtop guitar is called the 're-curve'. Once the box is together, you can make adjustments to this area on both the top and back to help the plates to vibrate more freely. I set to work scraping...

Sometimes it's hard to see where you are scraping so I used a white pencil to add some contrast.


Partially done.


Done for now. I may go a bit further, but I want to get strings on the guitar and see how it sounds before making the final adjustments


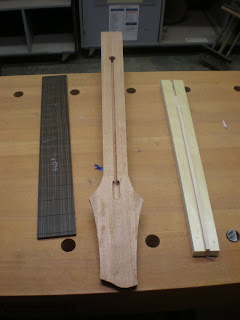
After an hour or two of scraping and taping I set the archtop aside and got to work on the necks. First step, was to get the fingerboards ready. A few years ago I got some really nice pieces of Maccassar Ebony. I resawed a couple of fingerboard blanks from one of them.


After milling the boards down to size, I got ready to cut the fret slots. On the left is the fingerboard for the flat-top which I slotted but forgot to take pictures of. On the right, is the archtop blank with double stick tape ready for the plexiglass fret scale template.


Here is the template in position, it has little notches cut out at each fret position.


The notches fit perfectly onto an indexing pin in a jig I made for my table saw. All it takes is one cut for each fret slot. This system works great for a standard fret instrument. When I make fanned fret guitars, it' s bit more complicated. Both of these guitars will have standard frets.


Presto! Two slotted fret boards.


Time to layout the necks.


After some careful planning I cut the necks out of the blank using the bandsaw.


The rough neck blanks cut out.


When a guitar is all finished and strung up to pitch, the tension of the strings cause the neck to bow upward. It's important to build in a way to counter-act this tension. The solution is to add a truss rod. Almost every guitar made these days has one. There are many types of truss rods, I prefer the Gibson style rod. Installation involves cutting a curved slot down the middle of the neck. I have a jig I made to do this, of course forgot to take pic's of the process. Anyway, here are the necks with the slots cut.


Traditionally, guitar necks are attached to the bodies with a dovetail joint. I got kind of involved with making the jig to make this all happen and forgot to snap some photos. Here is the end result.


On the left is flat-top neck, and on the right is the archtop neck. Because of the way the archtop neck attaches to the body I needed the install a bit of wood which extends beyond the dovetail. This is to support the fingerboard and is appropriately called the fingerboard extension. Anyway it requires a bit of fancy joinery to get it done. That is the reason for the notch which is cut from the end of the archtop neck.


Here I glued the extension in place.


Pretty soon we'll have finished necks! Stay tuned!

Friday, November 12, 2010

Photos from the new Archtop Build

After the 'my week in pictures' posts, I got a lot of feedback from people asking to see more photos of the new achtop build. So here's a quick update...

Sometimes it's hard to visualize the final product without actually creating it. I took a chance on these f-holes...I wasn't sure that I liked the shape of them, but I decided to cut them out anyway. Unfortunately when it was all said and done, I didn't like the f-hole at all. So I put the top away while I worked on building up the ring. Long story short, I pulled the top out this week and and spent some time with a pencil drawing out ideas to help the f-hole design. This is what I came up with. I think it works!


It was pretty hard to inlay the design however. I spend quite a few hours hunched over the work bench!


After getting the f-hole situation sorted out. I got started on the braces. Because the top is arched, you have to shape the braces to the contours of the top, It takes a bit of time to get it right. Unfortunately I didn't get any pictures of the fitting process. Here are the rough braces fit and glued to the inside of the top.


Once the braces are glued you have to shape them. The shaping helps to tune the sound of the guitar. Here, I'm just getting started.


Everything is starting to sound pretty good! I'm almost done


Here's the top is ready to be glued onto the ring which I built a week or so ago.


The top I glued on!


So now it's time to glue the back.


Here's the finished archtop box next to the flat top. Now that I have them both to the same point, I'll push them forward together.


Now it's time to do some neck building!

Thursday, October 28, 2010

My Week in Pictures: Friday 10.29.10

Friday, 8:30am

Today started much like yesterday...with some clean up!


Hide glue fingerprints are everywhere!


After a little bit of sanding everything is cleaned up! The next step is to add the vertical reinforcement strips which help to strengthen the sides.


One more.


Here's one with the clamps taken off.


With the vertical strips installed I add a bit of kerfed lining over the top. When the glue dries, the ring is ready for the top and back


11:00am
As the glue drys, I head over to Guru. During this week My brothers in arms, Gene and Horward had their own projects to tackle...


A customer brought in his 60's Vox Starstream. He asked Gene to reverse engineer the onboard effects and build them into a stompbox!


It's a huge project. Here's Gene in middle of the prototyping process.


A few of the parts in the original are not available any more, so Gene had to figure out some modern alternatives. Wires everywhere!


So far, it looks, and sounds cool though!


Meanwhile, Howard, is in the home stretch of refinishing a mid 60's Fender bass 5. I had no idea that 5 string basses were made that early!. When the customer brought this bass in, it was in bad shape. Someone tried a DIY refinish job and the body was pretty awful! After much rebuilding, he's getting close now! It's ready to assemble with a fresh finish and a custom machined re-production bridge(the old original was missing).


I was interested to see how the Yamaha was doing!


The bridge glued on great! so it was time to make the saddle.


And then a new nut.


I drill the bridge pin holes a bit small so I can ream them out for a nice fit.


With the strings on everything is looking good!


The finished nut.


Action is looking a lot better!


This guitar really turned out great! All of the hard work paid off!


It plays great! Another one brought back from the edge! I'm sure the customer will be really happy!


On to the next one...and oh what a tough one it is! Just kidding. Only a bad output jack! It takes a couple of minutes to solder in a new one.


Up next? a funky...


Conquerer Bruno!


...and by funky...I mean funky!


It's nice of somebody to mark the bridge location! Ha!


The electronics were not working. I thought there was a big problem, but they just turned out to be really dirty! So, A good cleaning was in order.


Before I knew it, 5:30pm rolled around, and I had to get going...We're off to be reasonable and non-confrontational at Jon Stewart's Rally to Restore Sanity! Have a great weekend everybody! Thanks for checking out the blog! I plan to keep posting pictures of the archtop build. Stay tuned for that!